Friday, 28 March 2014

symlink security issue - cPanel

cPanel symlink exploit


There is a serious security hole in the way that Apache handles symlinks on servers.

This allows an exploited account on a server to view .php files owned by other accounts, thus a single-account potentially exploits many accounts on the server.

The exploit, in general terms, is to create a symbolic link file (eg public_html/fred.txt) pointing to a wp-config.php file (eg /home/otheracct/public_html/wp-config.php) which contains database user and password which will occasionally be the cpanel username/password. The file is then readable via a web browser. If the user has been unwise enough to use their cpanel username/password for the database.

This script will find if there is any symlinks in the users home directory and save the output to /root/symlinks.txt

root@server1 [~]# find /home//public_html -type l >> /root/symlinks.txt

Solution :-

Rack911 has published an easyapache patch which adds the file /scripts/before-apache-make to force SymLinksIfOwnerMatch to be always on.

root@server1 [~]# wget http://layer1.rack911.com/before_apache_make -O /scripts/before_apache_make
root@server1 [~]# chmod 700 /scripts/before_apache_make


Rebuild apache after.
root@server1 [~]# /scripts/easyapache

Enable Symlink Race Condition Protection from Exhaustive Options list during the EasyApache build process.

Wednesday, 26 March 2014

Error unable to activate deactivate domain - Plesk

Error unable to activate deactivate domain


ERROR: Internal Plesk error occurred: Unable to activate/deactivate domain: Domain Mgmt backend failed: domainmng: /usr/lib/plesk-9.0/mailmng_domain_toggle execution failed: ERROR: Unable to remove record from virtualdomains file System error 2: No such file or directory domainmng: Error while turn off mail service on domain domain.com

OR

Error: Unable to activate/deactivate domain: Execute usermng access off failed: Change access failed of user (bsb): (2221) The user name could not be found.

Solution is need to disable the user account
Follow these steps:

1) You can disable the Plesk domain user by login to your Windows server.
2) Login to the server through RDP
3) Go to Computer management - users
4) Right Click on the user which is to be disabled.
5) Click on properties.
6) Tick the Box Account is disabled.
7) After that you activate or deactivate the domain.
8) If your process is success then again go to user and uncheck the box Account is disabled.


The topic on Whm-cpanel - Error unable to activate deactivate domain is posted by - Math

Hope you have enjoyed, Whm-cpanel - Error unable to activate deactivate domainThanks for your time

Tuesday, 25 March 2014

How to monitor and Deal with Spamming


It is difficult to track nobody spammers from exim_mainlog file. You can’t get exactly that who is using your server to send spams. If you check php.ini file you will see that the mail service is set to /usr/sbin/sendmail and almost all mail scripts are in use the built in mail(); function for PHP.It means that everything is going through /usr/sbin/sendmail.

We will try to get these users in your Linux Servers.

1. Login to server as root.

2. For safe side turn off exim.

[root@server~]#/etc/init.d/exim stop

3. Backup /usr/sbin/sendmail file. [Your server is using Exim as MTA (Mail Transfer Agent), Exim will use sendfile for just a pointer actually].

[root@server~]#mv /usr/sbin/sendmail /usr/sbin/sendmail.hidden

4. Now we will create a spam monitoring script for the new sendmail programme.

[root@server~]#pico /usr/sbin/sendmail

Paste in the following:

#!/usr/local/bin/perl
# use strict;
use Env;
my $date = `date`;
chomp $date;
open (INFO, “>>/var/log/spam_log”) || die “Failed to open file ::$!”;
my $uid = $>;
my @info = getpwuid($uid);
if($REMOTE_ADDR) {
print INFO “$date – $REMOTE_ADDR ran $SCRIPT_NAME at $SERVER_NAME n”;
}
else {
print INFO “$date – $PWD – @infon”;
}
my $mailprog = ‘/usr/sbin/sendmail.hidden’;
foreach (@ARGV) {
$arg=”$arg” . ” $_”;
}
open (MAIL,”|$mailprog $arg”) || die “cannot open $mailprog: $!n”;
while (<STDIN> ) {
print MAIL;
}
close (INFO);
close (MAIL);

5. Change the permissions new sendmail.

[root@server~]#chmod +x /usr/sbin/sendmail

6. New log file to save history which using web mail scripts.

[root@server~]#touch /var/log/spam_log

[root@server~]#chmod 0777 /var/log/spam_log

7. Start Exim.

[root@server~]#/etc/init.d/exim start

8. Now try any formmail script or any mail script which uses mail function and monitor new log file (spam_log)

[root@server~]#tail – f /var/log/spam_log

It should give us output like this:

Mon Nov 15 11:00:00 EST 2008 – /home/username/public_html/directory/subdirectory/subsubdirectory – nobody x 99 99 Nobody / /sbin/nologin

9. Log Rotation: This file is not set to be rotated file so there is a possibility that the file comes very large soon in size. So do this,

[root@server~]#pico /etc/logrotate.conf

Find >>

# no packages own wtmp — we’ll rotate them here

/var/log/wtmp {
monthly
create 0664 root utmp
rotate 1
}

Add >>

# SPAM LOG rotation

/var/log/spam_log {
monthly
create 0777 root root
rotate 1
}

10. We will set attributes for new sendmail programme file so it will not get overwritten.

[root@server~]#chattr + i /usr/sbin/sendmail

Now we can get nobody spam users, Goodluck.

Sunday, 23 March 2014

Comandline Tools to Monitor MySQL Performance in Linux

There are plenty of tools to monitor MySQL performance and troubleshoot a server, but they don’t always perfect match for a MySQL developer or administrator’s for their common needs, or may not work in some situations, such as remote or over the web monitoring.

Luckily, there are variety of open source tools created by MySQL community to fill the gaps. On the other hand, it’s very difficult to locate these tools via web searches, that’s the reason we’ve compiled 4 command line tools to monitor MySQL database uptime, load and performance in Linux.

Uptime means how long the database has been running and up since its last shutdown or restart. Getting information about uptime is very crucial in many situations, as it helps system administrators to check the status of MySQL database about, how many queries per second that MySQL database serves, threads, slow queries and lots of interesting statistics.

1. Mytop


Mytop is one of my classic open source and free console-based (non-gui) monitoring tool for MySQL database was written by Jereme Zawodny using Perl language. Mytop runs in a terminal and displays statistics about threads, queries, slow queries, uptime, load, etc. in tabular format, much similar to the Linux top program. Which indirectly helps the administrators to optimize and improve performance of MySQl to handle large requests and decrease server load.

Install Mytop Mysql Monitoring in Linux

There are mytop packages available for various Linux distributions, such as Ubuntu, Fedora and CentOS. For more about installation instruction read: How to Install Mytop (MySQL Monitoring) in Linux

2. Mtop


mtop (MySQL top) is a another similar open source, command line based real time MYSQL Server monitoring tool, was written in Perl language that display results in tabular format much like mytop. mtop monitors MySQL queries which are taking the most amount of time to finish and kills those long running queries after certain specified time.

In addition, it also enable us to identify performance related problems, configuration information, performance statistics and tuning related tips from the command line interface. The two tools are very similar, but mtop is not actively maintained and may not work on newly installed MySQL versions.

Install mtop in Linux

For more about installation instruction read: How to Install Mtop (MySQL Monitoring) in Linux

3. Innotop


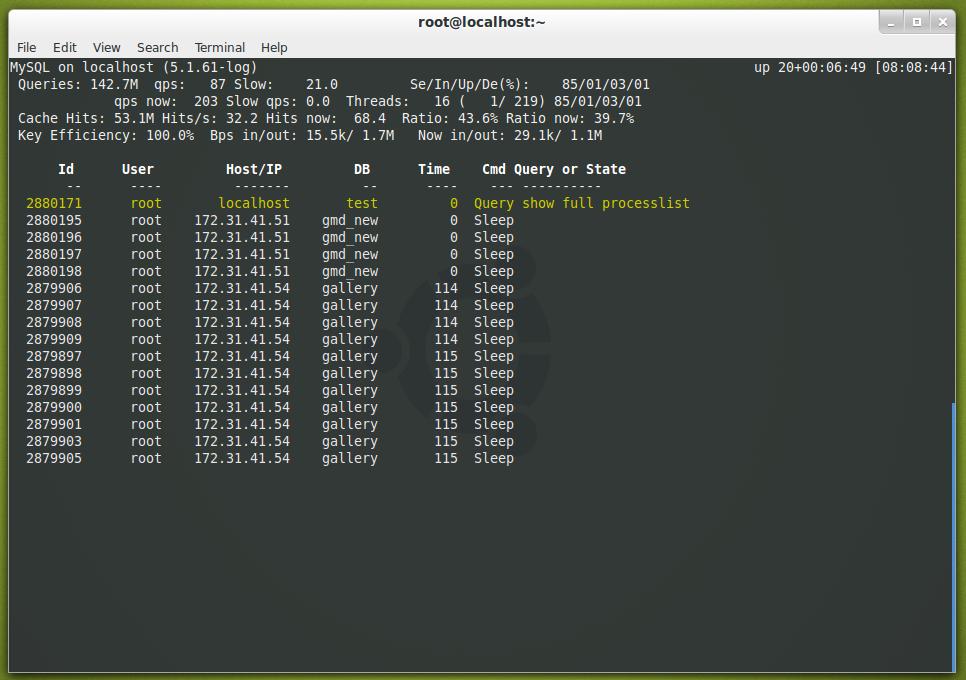
Innotop is a real time advanced command line based investigation program to monitor local and remote MySQL servers running under InnoDB engine. Innotop includes many features and comes with different types of modes/options, which helps us to monitor various aspects of MySQL performance to find out what’s wrong going with MySQL server.

Install Innotop in Linux

For more about installation instruction read: How to Install Innotop (MySQL Monitoring) in Linux

4. mysqladmin


mysqladmin is a default command line MySQL client that comes pre-installed with MySQL package for performing administrative operations such as monitoring processes, checking server configuration, reloading privileges, current status, setting root password, changing root password, create/drop databases, and much more.

To check the mysql status as well as uptime run the following command from the terminal, and make sure you must have root permission to execute the command from the shell.
[root@localhost ~]# mysqladmin -u root -p version
Enter password:

Sample Output

mysqladmin  Ver 8.42 Distrib 5.1.61, for redhat-linux-gnu on i386
Copyright (c) 2000, 2011, Oracle and/or its affiliates. All rights reserved.

Oracle is a registered trademark of Oracle Corporation and/or its
affiliates. Other names may be trademarks of their respective
owners.

Server version 5.1.61-log
Protocol version 10
Connection Localhost via UNIX socket
UNIX socket /var/lib/mysql/mysql.sock
Uptime: 20 days 54 min 30 sec

Threads: 1 Questions: 149941143 Slow queries: 21 Opens: 752 Flush tables: 1 Open tables: 745 Queries per second avg: 86.607

For more about mysqladmin commands and examples, read: 20 mysqladmin Commands for MySQL Administration in Linux

Conclusion


If you’re looking for a good monitor tool for your own work, I recommend mytop and innotop. I used to depend on mytop for my daily monitoring purposes, but now I shifted to innotop, because it displays much more statistics and information, including important transactions.

Saturday, 22 March 2014

Search and Replace

Customer has been a victim of iframe code injections in multiple pages. Use this grep/sed command will come in handy for clearing the majority of them out. Please be careful and test first with just the grep command to ensure you don't clear out anything you need. Does NOT backup files, be sure to backup first!

download: http://erikimh.com/code/rmcodeinjections.sh


this will remove all iframe injections from a particular file or wildcard set of files

usage example: ./rmcodeinjections.sh *.php


Replacing /var/named domains IP addresses with perl

Sometimes you need to replace an instance of one string in a file with another string. If there's multiple occurrences, this can be a pain. Here's a simple example of how you can use perl to replace all instances of an IP address for a moved a domain.

To do it:

perl -i.bak -pe "s/0.0.0.0/1.2.3.4/g" /var/named/domain.com.db


This example shows how to change from IP 0.0.0.0 to 1.2.3.4
This will also makes a backup of /var/named/domain.com.db as /var/named/domain.com.db.bkp

If you're feeling ballsy and do not want backup run:

perl -i -pe "s/0.0.0.0/1.2.3.4/g" /var/named/domain.com.db


One alternate way would be (without perl):

replace 0.0.0.0 1.2.3.4 -- /var/named/domain.com.db

Differnce Shared hosting - VPS Hosting - Dedicated server hosting


When we think of hosting our site three types of hosting comes to our mind Shared Hosting, VPS (Virtual Private Server) and Dedicated Server. The pricing of these services varies from provider to provider and resources you want. Now what is the difference between these three services ?

1. Shared Hosting :

Shared hosting is a hosting service where many users share a single server. All the users have a separate directory where they can upload their files. This is generally most economical option as all the users share the overall cost of the server. The server is administered by the hosting provider and the technical tasks like managing servers, installing server software, security updates, technical support, etc. are the responsibility of the server admin. These servers generally use control panels like cPanel, Directadmin, Plesk, Interworx, etc which allow the users to manage their websites.

2. VPS (Virtual Private Server) :

VPS (Virtual Private Server) is a virtual machine created on a physical server. The hosting provider creates multiple VPS on a physical server and provides access to their users. VPS is as good as a dedicated server but with limited resources. VPS provides root access to the user so the user can install any software/OS and perform any root level tasks. This option is a little expensive as it is more powerful than a shared hosting account and has more privileges.

3. Dedicated Server :

Dedicated server is a service where the user leases the entire physical server and is not shared by anyone else. Unlike VPS and Shared hosting the user has full control over the server. The user can choose the hardware, software, OS, etc. Dedicated server is useful because of the benefits like high performance, security, email stability and control. This option is the costliest as you are the only one who is bearing the cost of the entire server. Most of the providers offer Managed dedicated server where the server is managed by the provider upto some extent.

Who should go for Shared hosting ?

The users who just want a business website and do not need much resources can opt for shared hosting as the cost involved in shared hosting is nominal. If you are a start up company and want an online presence shared hosting is the best for you.

Who should go for a VPS ?

The users who have sites with huge volume of visits and complex tasks being executed VPS hosting is recommended. This is because such website requires high amount of resources and constant monitoring on the part of the server admin. VPS becomes bit expensive but if you need more resources it is better to go for a VPS.

Who should go for a Dedicated Server ?

Dedicated server is recommended for big companies and institutions who have huge data and perform multiple tasks and calculations. Dedicated server is expensive but you have full control over the server and you can install anything you require for your site. With a dedicated server you have ample resources to handle any volume of requests for your site.

Friday, 21 March 2014

Leave Copies Of Messages On Server

Most POP mail clients will automatically remove the messages from the mail server when it downloads them unless it is specifically configured to leave mail on the server. All of your emails should be saved locally on the computer that your POP client is on and still available from your mail client on that machine.


If you wish to leave a copy of the mail on the server so it can be accessed from multiple locations, you will need to change your download settings:


  • For Outlook, click on Tools > E-mail Accounts select "View or change existing e-mail accounts" and press "Next". Select the correct account and click "Change", then the "More Settings" button. You will then go to the "Advanced" tab  and  find the "Delivery" section at the bottom. Check "Leave a copy of messages on server".


If you want to put your mail back on the server, you will need to reconfigure your mail client to connect with IMAP instead of POP and then import your mail back to the server. You will need to find the file that your mail is being stored in and then import the data in your IMAP mail profile, or simply drag and drop the mail from your local folders into the IMAP inbox.


Note: After you import mail via IMAP, if you connect with the POP client again, all of the email will download a second time and show up in your POP mail client as duplicates. In order to avoid duplicates, it is recommended that you move the mail from your inbox to another local folder before you connect back to the mail server via POP.