Many people want WordPress to power their site's root (e.g.
http://example.com) but they don't want all of the WordPress files cluttering up their root directory. WordPress allows you to install it into a subdirectory, but have your blog exist in the site root.
As of
Version 3.5.1, Multisite users may use all of the functionality listed below. If you are running a version of WordPress older then 3.5.1, please update before installing a Multisite WordPress install on a subdirectory.
Moving a Root install to its own directory
The process to move WordPress into its own directory is as follows:
- Create the new location for the core WordPress files to be stored (we will use /wordpress in our examples). (On linux, use mkdir wordpress from your www directory. You'll probably want to use "chown apache:apache" on the wordpress directory you created.)
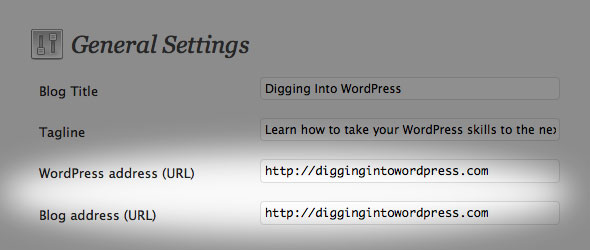
- Go to the General panel.
- In the box for WordPress address (URL): change the address to the new location of your main WordPress core files. Example: http://example.com/wordpress
- In the box for Site address (URL): change the address to the root directory's URL. Example: http://example.com
- Click Save Changes. (Do not worry about the error message and do not try to see your blog at this point! You will probably get a message about file not found.)
- Move your WordPress core files to the new location (WordPress address).
- Copy (NOT MOVE!) the index.php and .htaccess files from the WordPress directory into the root directory of your site (Blog address). The .htaccess file is invisible, so you may have to set your FTP client to show hidden files. If you are not using pretty permalinks, then you may not have a .htaccess file.
- If you are running WordPress on a Windows (IIS) server and are using pretty permalinks, you'll have a web.config rather than a .htaccess file in your WordPress directory. For the index.php file the instructions remain the same, copy (don't move) the index.php file to your root directory. The web.config file, must be treated differently then the .htaccess file so you must MOVE (DON'T COPY) the web.config file to your root directory.
- Open your root directory's index.php file in a text editor
- Change the following and save the file. Change the line that says:
require('./wp-blog-header.php');
to the following, using your directory name for the WordPress core files:
require('./wordpress/wp-blog-header.php');
- Login to the new location. It might now be http://example.com/wordpress/wp-admin/
- If you have set up Permalinks, go to the Permalinks panel and update your Permalink structure. WordPress will automatically update your .htaccess file if it has the appropriate file permissions. If WordPress can't write to your .htaccess file, it will display the new rewrite rules to you, which you should manually copy into your .htaccess file (in the same directory as the main index.php file.)
Giving WordPress Its Own Directory
Languages:
English •
Français •
??? •
??????? •
(Add your language)Many people want WordPress to power their site's root (e.g.
http://example.com) but they don't want all of the WordPress files cluttering up their root directory. WordPress allows you to install it into a subdirectory, but have your blog exist in the site root.
As of
Version 3.5, Multisite users may use all of the functionality listed below. If you are running a version of WordPress older then 3.5, please update before installing a Multisite WordPress install on a subdirectory.
Moving a Root install to its own directory
The process to move WordPress into its own directory is as follows:
- Create the new location for the core WordPress files to be stored (we will use /wordpress in our examples). (On linux, use mkdir wordpress from your www directory. You'll probably want to use "chown apache:apache" on the wordpress directory you created.)
- Go to the General panel.
- In the box for WordPress address (URL): change the address to the new location of your main WordPress core files. Example: http://example.com/wordpress
- In the box for Site address (URL): change the address to the root directory's URL. Example: http://example.com
- Click Save Changes. (Do not worry about the error message and do not try to see your blog at this point! You will probably get a message about file not found.)
- Move your WordPress core files to the new location (WordPress address).
- Copy (NOT MOVE!) the index.php and .htaccess files from the WordPress directory into the root directory of your site (Blog address). The .htaccess file is invisible, so you may have to set your FTP client to show hidden files. If you are not using pretty permalinks, then you may not have a .htaccess file.
- If you are running WordPress on a Windows (IIS) server and are using pretty permalinks, you'll have a web.config rather than a .htaccess file in your WordPress directory. For the index.php file the instructions remain the same, copy (don't move) the index.php file to your root directory. The web.config file, must be treated differently then the .htaccess file so you must MOVE (DON'T COPY) the web.config file to your root directory.
- Open your root directory's index.php file in a text editor
- Change the following and save the file. Change the line that says:
require('./wp-blog-header.php');
to the following, using your directory name for the WordPress core files:
require('./wordpress/wp-blog-header.php');
- Login to the new location. It might now be http://example.com/wordpress/wp-admin/
- If you have set up Permalinks, go to the Permalinks panel and update your Permalink structure. WordPress will automatically update your .htaccess file if it has the appropriate file permissions. If WordPress can't write to your .htaccess file, it will display the new rewrite rules to you, which you should manually copy into your .htaccess file (in the same directory as the main index.php file.)
Using a pre-existing subdirectory install
If you already have WordPress installed in its own folder (e.g.,
http://example.com/wordpress), then the steps are as follows:
- Go to the General panel.
- In the box for Site address (URL): change the address to the root directory's URL. Example: http://example.com
- Click Save Changes. (Do not worry about the error message and do not try to see your blog at this point! You will probably get a message about file not found.)
- Copy (NOT MOVE!) the index.php and .htaccess files from the WordPress (wordpress in our example) directory into the root directory of your site—the latter is probably named something like www or public_html. The .htaccess file is invisible, so you may have to set your FTP client to show hidden files. If you are not using pretty permalinks, then you may not have a .htaccess file. If you are running WordPress on a Windows (IIS) server and are using pretty permalinks, you'll have a web.config rather than a .htaccess file in your WordPress directory.
- Move (DON'T COPY) the wp-config.php file to your root directory.
- Edit your root directory's index.php.
- Open your root directory's index.php file in a text editor
- Change the line that says:
require('./wp-blog-header.php');
to the following, using your directory name for the WordPress core files:
require('./wordpress/wp-blog-header.php');
- Save the file.
- Login to your site (if you aren't still already). The URL should still be http://example.com/wordpress/wp-admin/
- If you have set up Permalinks, go to the Permalinks panel and update your Permalink structure. WordPress will automatically update your .htaccess file if it has the appropriate file permissions. If WordPress can't write to your .htaccess file, it will display the new rewrite rules to you, which you should manually copy into your .htaccess file (in the same directory as the main index.php file.)
Since the site is not working for some of these steps, it is best to make this change at a time of low activity, e.g., the middle of the night.
If you already have content in your site, see
when your domain name or URLs change for how to deal with references to the old URL that will remain in the database.
Pointing your home site's URL to a subdirectory
In some cases, you may have a WordPress site that changes significantly every year, such as with a conference website. If you want to install each year's version of the site in a subdirectory, such as /2010, /2011, and /2012, but have the root domain (yoursite.com) automatically redirect to a particular subdirectory (usually the latest), follow this technique:
- Install WordPress in a subdirectory, such as /2012.
- In your root folder (not the subdirectory folder), download and open your .htaccess file.
- Add the following to your .htaccess file:
RewriteEngine On
RewriteCond %{HTTP_HOST} ^(www.)?YourDomain.com$
RewriteRule ^(/)?$ blog [L]
- In the above code, change the "YourDomain.com" value to your root domain.
- In the above code, change the "blog" value to the subdirectory.
- Save and upload the .htacess file back to your root directory.
Now when users to go your root domain (yoursite.com), it will automatically redirect to the subdirectory you specified. When you want to redirect to a new subdirectory, such as the conference site for next year, just update the .htaccess redirect code.